Table of Contents
HOWTO: Ubuntu Server + AMD Catalyst + hashcat
Many users desire to run hashcat on headless Linux servers. This guide will walk you through the best known method for setting up a headless Linux server with AMD Radeon GPUs.
This guide is currently based on Ubuntu Server 14.04 LTS and AMD Catalyst 14.9
Disclaimer
THIS GUIDE IS PROVIDED ``AS IS'' AND WITHOUT ANY EXPRESS OR IMPLIED WARRANTIES, INCLUDING, WITHOUT LIMITATION, THE IMPLIED WARRANTIES OF FITNESS FOR A PARTICULAR PURPOSE. WE WILL NOT ACCEPT ANY LIABILITY FOR ANY SECURITY RISKS YOU INTRODUCE TO YOUR ENVIRONMENT UPON FOLLOWING THIS GUIDE.
At a minimum, you should ensure that all commands are executed in a trusted – and preferably isolated – environment.
Obtaining Ubuntu Server 14.04 LTS
You might think that 14.04 is ancient. You may be inclined to install a more recent distribution, because “newer must be better.” Don't do it. Don't even think about doing it. Stick with the LTS release. You've been warned!
Download the server install CD from http://mirrors.kernel.org/ubuntu-releases/14.04/ubuntu-14.04.4-server-amd64.iso. The server install CD allows you to install Ubuntu permanently on a computer for use as a server. It will not install a graphical user interface.
If you need help burning these images to disk, see the CD Burning Guide.
Installing Ubuntu Server
The Ubuntu installer is extremely straight-forward – just follow the prompts as normal.
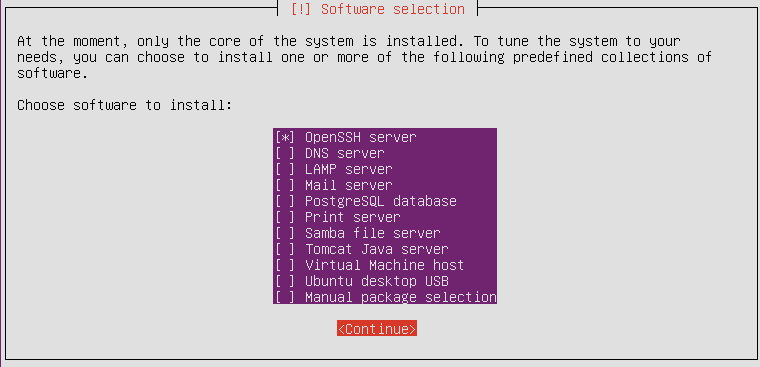
However, when you get to the Software Selection screen, make sure that only “OpenSSH Server” is selected. Do not select any additional software packages!
Post-Installation Configuration
Immediately upon booting your new installation, you should ensure that all updates are installed. It is important to do this first since you will undoubtedly need to install a newer kernel, which will affect building the fglrx module.
64-bit users: it is highly recommended you disable multiarch support to ensure you have a pure 64-bit environment. It can save yourself a lot of headaches in the future! 32-bit libraries are a cancer – once one gets pulled in, more and more will get pulled in, until you are eventually primarily running a 32-bit userspace!
Reboot after the system has been upgraded to boot the new kernel.
dpkg --remove-architecture i386
aptitude update && aptitude -y full-upgrade
sync && reboot
Installing a Minimal X11 Environment
Even though we are not using our GPUs to push any pixels, we still need to install a graphical environment on our servers so that libatiadlxx can monitor and manage the GPUs. Since we do not want to install a heavy, bloated desktop environment on our servers, we will instead install a very minimal X11 environment. And now that Ubuntu is packaging sane AMD drivers, we'll go ahead and install fglrx in this step as well!
Install all the things:
aptitude install build-essential dkms xserver-xorg xserver-xorg-core \
xserver-xorg-input-evdev xserver-xorg-video-dummy x11-xserver-utils fglrx xdm
Configure all the things:
amdconfig --adapter=all --initial -f

cat > /etc/X11/xdm/Xsetup << EOF
export PATH=/bin:/usr/bin:/sbin
export HOME=/root
export DISPLAY=:0
xset -dpms
xset s off
xhost +
EOF

echo 'export DISPLAY=:0' >> ~/.bashrc
echo 'export DISPLAY=:0' >> /etc/skel/.bashrc

update-rc.d xdm defaults

sync && reboot
Finishing Up
Your server should now be ready to start running OpenCL applications. Verify that things are working:
ps -ef | grep X                   ## should show that X is running

clinfo                            ## should show all GPUs + CPU

amdconfig --adapter=all --odgt    ## should show temperature of all GPUs
If everything looks good, proceed to download and install all your favorite Hashcat tools! And if you are using an Overdrive6 GPU (R9 290/290X/390/390X), you may want to install od6config to help manage your GPUs.
If things don't look good, investigate the log files (/var/log/xdm.log, /var/log/Xorg.0.log) to see if there are any obvious errors.
If you have identified any errors or inaccuracies with this article, or would like to propose any alternative methods, please contact epixoip
